3000×600 px Amazon Store Banner Size, Copyable Specs for Designers
The recommended Amazon Store hero/banner size is 3000 × 600 pixels, with a maximum file size of 5 MB in JPG, PNG, TIFF, or static GIF format. Anything smaller than that resolution risks looking blurry on high-density displays, and anything over 5 MB will get bounced during upload. Keep your logo, headline, and product hero centered, because Amazon crops the edges on smaller screens.
TL;DR:
The hero banner size must be exactly 3000 × 600 pixels with a file size under 5 MB to ensure sharp display on high-density monitors and successful upload.
Critical content such as logos and headlines should be placed within the center 50% of the banner to prevent cropping on mobile devices, where up to 30% of the image might be obscured.
Export images in sRGB color profile, optimized at 75–85% JPEG quality, and crop the design to the safe zone before compression to avoid pixelation and resolution issues.
Always preview your banner on actual devices across desktop, tablet, and mobile to prevent key elements from cropping or disappearing in Amazon’s responsive layout.
Avoid embedding heavy text into images; instead, use Amazon’s layered text tiles for better accessibility, search indexing, and clear mobile readability.
Productphotoapp.productphoto.comCreate Amazon-Ready Product VisualsProductphoto creates conversion-optimized visuals for e-commerce brands, including lifestyle photography and detailed infographics through a seamless online process.Get started online
Table of Contents
What Are the Amazon Storefront Banner Dimensions and Specs?
Why Does Amazon Recommend 3000 × 600 Px for the Hero Image?
How Big Should Store Tiles Be, and Which One Should You Use?
Which File Format and Export Settings Actually Work?
How Does Amazon Crop and Scale Banners on Different Devices?
Should You Put Text in Your Store Banner Image?
How Do You Upload, Preview, and Publish a Store Banner?
Pre-Publish Checklist for Amazon Store Banners
What Makes ProductPhoto a Reliable Source on This Topic?
The Mistakes Brands Keep Making With Store Banners
Get Your Amazon Store Banner Built Right the First Time
Sources
FAQ
What Are the Amazon Storefront Banner Dimensions and Specs?
Every element on your Brand Store has its own pixel requirements, and mixing them up is the fastest way to submit a banner that gets rejected or looks stretched on mobile. Here’s the full breakdown in one place, so you’re not toggling between three different Amazon help pages while your design software is open.
These figures come straight from Amazon’s own Stores creative guidelines, and the same page lists the text pixel-height rules you’ll need if you’re embedding copy inside a tile rather than using a text overlay. One note worth flagging early: some full-width shoppable image configurations call for a wider minimum, so double-check the tile type before you export.
Why Does Amazon Recommend 3000 × 600 Px for the Hero Image?
That aspect ratio (5:1, extremely wide and short) exists because the banner spans the full width of the Store page on desktop, and Amazon needs enough native resolution to render sharply on 4K and Retina displays without upscaling artifacts. Export at anything lower, like 1500 × 300 px, and you’ll see soft edges and pixelation the moment a shopper zooms or views your Store on a larger monitor.
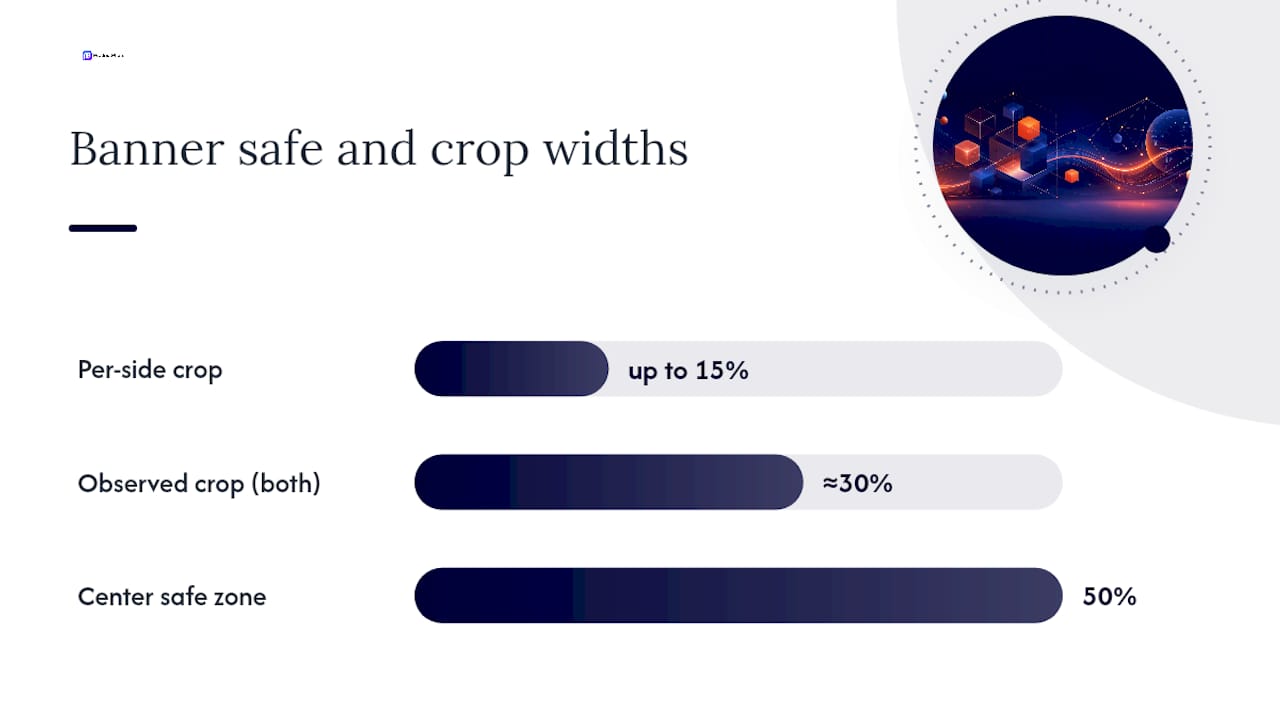
The trickier part is what happens on phones. Amazon’s layout engine reflows the banner responsively, and its own guidance confirms that critical content should stay in the center safe zone, since screens can crop up to 15% off each side depending on device width. In practice, some small-screen arrangements can obscure closer to 30% of the total image across both edges combined, so a logo or headline sitting near the left or right third of your canvas is a real risk, not a theoretical one.
A few composition habits solve most of this before it becomes a problem:
Keep your product shot, wordmark, and any call-to-action text inside the center 50% of the banner width.
Build one high-resolution layered master (Photoshop or Figma file) at full size, then export flattened JPGs or PNGs from it, so you can adjust and re-export without starting over.
Favor a single strong focal point over busy backgrounds. A hero banner is glanced at, not studied.
Keep text minimal. If you need a headline, treat it as a bonus, not the main event, since Amazon discourages heavy in-image copy anyway.
Write meaningful alt text for the image in Store Builder, both for accessibility and because Amazon’s search indexing can pick up on it.
Pro Tip: Export two versions of your master file: one full 3000 × 600 px file, and one cropped to roughly the center 1500 × 600 px. Overlay them in your design software before you finalize anything. If the cropped version still tells your brand story on its own, your safe zone is solid.
How Big Should Store Tiles Be, and Which One Should You Use?
Store Builder gives you four tile sizes, and each one serves a different job on the page rather than being interchangeable versions of the same thing.
Full-width and large tiles also support shoppable images, where you tag specific products directly on the photo so shoppers can click straight through. Amazon’s own shoppable image guidance recommends a 3000-pixel-wide minimum for full-width shoppable configurations, wider than the standard tile minimum, because the tagging dots need room to sit cleanly without overlapping product edges.
A few practical rules apply across every tile type:
All accept JPG, PNG, and static GIF; none support animated GIF.
Some large and full-width placements support video or background video, which is worth using if you have product footage rather than only static shots.
Use large tiles when you want one product to carry visual weight; use small tiles when you’re showcasing a catalog breadth story instead of a single hero item.
Mixing tile sizes deliberately, rather than defaulting to all-medium, is what makes a Store page feel designed instead of assembled.
Which File Format and Export Settings Actually Work?
JPG is the right call for almost every photographic banner and tile, since it compresses well without a huge quality hit. PNG earns its place only when you need transparency, like a logo floating over a colored background. TIFF is strictly a master-file format, never something you upload to Amazon; it’s too large and Amazon’s own spec treats it as an accepted format mainly for archival quality, not everyday use. Static GIF is rarely the right choice unless you’re working with simple flat-color graphics, since it handles photographic gradients poorly.
Color profile matters more than most sellers realize. Export in sRGB, not Adobe RGB or CMYK, or your colors will shift once Amazon’s system renders them, sometimes noticeably duller or off-hue from what you saw in your design software.
For getting under the 5 MB ceiling without visible quality loss, a dependable workflow looks like this:
Design and save your layered master at full resolution, then flatten a copy for export instead of editing the master directly.
Resize to the exact target dimensions (3000 × 600 px for hero, or the relevant tile size) before compressing, never after.
Export as JPEG at 75 to 85% quality with the sRGB profile, then check the resulting file size.
If you’re still over 5 MB, drop quality in 5% increments and recheck. This gets you under the limit without visible banding in most cases.
Sharpen slightly after resizing down, since scaling software softens edges by default.
Pro Tip: Never upload directly from your design software’s default export preset. Those presets are built for print or general web use, not Amazon’s specific pixel and file-size combination, and they’ll waste your upload attempts.
How Does Amazon Crop and Scale Banners on Different Devices?
Amazon’s Store pages are responsive, which means your banner doesn’t display at a fixed size everywhere. It scales and, on smaller screens, crops from the edges while keeping the center of the image intact. That’s a deliberate design choice on Amazon’s part, not a bug, but it means a banner that looks perfect in your design file can lose its logo or tagline entirely on a phone.
A short, repeatable testing routine prevents most of the surprises:
Build your layered master first, with the product shot and text placed inside the center safe zone.
Export the full 3000 × 600 px file and upload it in Store Builder.
Use Store Builder’s built-in preview tool to check how the banner renders on desktop, tablet, and mobile views before you publish.
Open the live preview link on an actual phone, not just the in-tool simulator, since real device rendering can differ slightly.
If key branding gets clipped, pull the elements further toward center and re-export rather than shrinking the whole composition, which just makes everything harder to read.
Save the test as your baseline. Future banners built on the same template need less rechecking.
Skipping the device check is the single most common reason brands end up revising a banner after it’s already live. A five-minute preview pass costs far less time than a rebuild.
Should You Put Text in Your Store Banner Image?
Amazon’s own guidance discourages burning text directly into banner and tile images, and for good reason: baked-in text can’t be read by screen readers or indexed by search, which hurts both accessibility and discoverability. Store Builder’s “image with text” tile exists specifically to solve this. It lets you layer real, selectable text over an image using the platform’s own text tool instead of flattening words into the graphic.
If you do need text embedded in an image for a specific design reason, Amazon’s spec sheet gives concrete pixel-height minimums: 32 pixels tall for full-width tiles, and 16 pixels for other tile sizes. Text smaller than that reads as a blur on mobile screens, especially at typical phone viewing distances.
A few things that make embedded or overlay text actually work:
Use high contrast between text and background. Light gray text on a white product photo disappears on smaller displays.
Keep headlines to a handful of words. A banner is not the place for a paragraph.
Test your font at actual mobile size before finalizing, not just at your desktop monitor’s zoom level.
Default to the native text tile whenever your layout allows it, since it’s both more accessible and easier to update later without a new export.
Screen reader users, and Amazon’s own search crawling, both benefit when text lives as text rather than as pixels. That’s a discoverability advantage most sellers never think about until a compliance review flags it.
How Do You Upload, Preview, and Publish a Store Banner?
Getting a banner live involves a short sequence inside Store Builder, and most delays happen because a step gets skipped rather than because the tool is confusing.
Open Store Builder and navigate to the page template where your hero banner belongs, then select the banner module.
Upload your exported 3000 × 600 px file (or 400 × 400 px logo, if that’s the asset in question) and confirm it meets the 5 MB ceiling before the tool accepts it.
Use the built-in device preview to check desktop, tablet, and mobile renderings in one view.
Add alt text describing the image content for accessibility and search purposes.
Submit the page for publishing. Moderation review can take up to 24 hours, so timing matters if you’re launching around a sale date.
If the asset gets rejected, check the notification for the specific reason. Common causes include oversized file weight, low resolution, prohibited claims in text overlays, or trademark issues in imagery.
Correct the flagged issue, re-export if needed, and resubmit. Most second submissions clear faster since you’re only fixing one specific flaw.
Building in a buffer of a day or two before any promotional launch date isn’t optional if you want your banner live on time. Waiting until the morning of a sale to submit is how brands end up running their old, outdated Store page during their biggest traffic day.
Pre-Publish Checklist for Amazon Store Banners
Before you hit submit, run through this list. It takes about two minutes and catches the mistakes that otherwise turn into a rejection notice and a lost day.
Pixel dimensions match spec exactly (3000 × 600 px hero, 400 × 400 px logo, correct tile minimums).
File size is under 5 MB for every asset, checked individually.
Color profile is sRGB, not CMYK or Adobe RGB.
Format is JPG, PNG, TIFF, or static GIF as appropriate for the asset type.
Critical branding sits inside the center safe zone, verified in device preview.
Logo is legible and not distorted at its display size.
You hold rights to every photo, including any model releases for lifestyle imagery.
Shoppable tags, if used, link to the correct live product listings.
Check | Why it matters |
|---|---|
Dimensions and file size | Prevents automatic upload rejection |
Safe zone placement | Prevents cropping on mobile |
Rights and releases | Prevents legal or policy takedowns |
Shoppable tag accuracy | Prevents broken links to products |
What Makes ProductPhoto a Reliable Source on This Topic?
ProductPhoto has delivered more than 250,000 images for over 3,000 customers, most of them built specifically for Amazon listings and Brand Store pages, which means the specs in this guide reflect assets that have actually gone through Amazon’s moderation process repeatedly, not just theoretical dimensions copied from a spec sheet.
The service lineup maps directly onto what a Brand Store needs: the Amazon Starter and Pro Listing Packages cover core product and hero imagery, Lifestyle & Creative shoots produce banner-ready scene photography, Product Videos fill the tile types that support motion, and Infographics & Graphics handle the callout-style tiles that explain product benefits without relying on embedded text.
Professional exports matter here for a concrete reason: files built to the exact pixel dimensions, correct color profile, and file-size ceiling clear moderation faster and avoid the resubmission cycle that eats into launch timelines. A blurry or oversized banner doesn’t just look worse. It stalls your Store page from going live on schedule.
The Mistakes Brands Keep Making With Store Banners
The most common failure isn’t a wrong pixel count. It’s designing the banner on a wide desktop monitor, approving it there, and never once checking a phone preview before publishing. Since most Amazon shopping happens on mobile, that’s the equivalent of designing a billboard and only ever looking at the miniature mockup.
The second mistake is treating the hero banner as a place to cram a value proposition in text. Amazon’s own tools exist to separate image and copy for a reason: readability and search indexing both suffer when words get baked into a JPG. If you’re tempted to add a headline, ask whether the “image with text” tile could do the same job better.
The threshold for hiring a professional is simple: if you’re relaunching a Store page for a major push, or your in-house exports keep getting rejected on file size or resolution, that’s the signal to stop troubleshooting export settings and get files built correctly the first time.
— Sam
Get Your Amazon Store Banner Built Right the First Time
Getting the pixel math right is only half the job. The bigger cost most sellers underestimate is the time lost to rejected uploads, mismatched color profiles, and banners that looked great on a laptop but fell apart on mobile. Brand Store assets built from scratch, sized and profiled to Amazon’s exact specs, help ensure your uploads clear moderation the first time.
The Amazon Starter Listing Package and Amazon Pro Listing Package cover hero banners, logos, and product tiles built to spec, with unlimited royalty-free usage once delivered. If your Store needs scene-based hero imagery instead of a plain product shot, the Lifestyle & Creative service produces banner-ready photography designed around your brand rather than a template. Sellers running a full Store refresh, including motion tiles, typically add Product Videos to the mix. Orders often run through a streamlined online booking flow with no upfront payment and quick turnaround, helping avoid delays tied to a launch date.
Start by requesting your Amazon product photography package and specify your Store banner needs in the order notes.
Sources
FAQ
What Is the Recommended Amazon Store Banner Size?
The recommended size is 3000 × 600 pixels, with a maximum file size of 5 MB in JPG, PNG, TIFF, or static GIF format. This applies to the main hero banner at the top of your Brand Store page.
How Do I Add a Banner to My Amazon Storefront?
Open Store Builder, select the hero banner module on your page template, and upload your exported file once it meets the size and format requirements. Use the built-in preview tool to check desktop and mobile rendering before submitting the page for moderation review.
What Size Should an Amazon Store Logo Be?
Amazon’s Brand logo spec calls for 400 × 400 pixels, using the same 5 MB file-size ceiling and JPG or PNG format as other Store assets. Keep the logo simple and legible, since it also displays at small sizes in search and navigation elements.
What Is Amazon Listing Image Size Versus Store Banner Size?
Product listing images follow a separate square format requirement for the main image, distinct from the wide 3000 × 600 px Store banner format. Storefront banners and tiles use the wide and square dimensions detailed in Amazon’s Stores creative guidelines, while listing images serve the product detail page instead of the Brand Store.
What Is an Amazon Banner, Exactly?
An Amazon banner is the wide hero image at the top of a Brand Store page, used to introduce a brand or highlight a featured product or campaign. It’s distinct from tile images, which populate the grid sections further down the Store page. Brands that need this built professionally can commission it through services like ProductPhoto’s Amazon photography packages.
ProductphotoDiscuss Your Banner NeedsEmail Productphoto with questions about product photography, Amazon visuals, lifestyle shots, or infographics for your e-commerce brand.PProductphotoEmail Productphotoinfo@productphoto.com